obsidian从零开始搭建hugo博客(二)快速建站

系列 - 利用obsidian从零开始搭建hugo博客

在这个教程中,你将:

  1. 生成站点
  2. 添加文档
  3. 配置站点
  4. 发布文档

注意,官方文档表示Windows用户不能用powershell执行以下命令,但是我用powershell大部分步骤都是没问题的,有问题的步骤会特别指出。

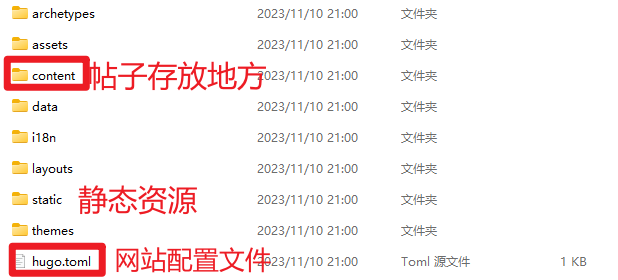
随便建立一个目录,用终端打开后输入hugo new site quickstart,就会生成一个文件夹quickstart

 1
 2
 3
 4
 5
 6
 7
 8
 9
10
11
12
13
14
15
PS C:\Users\pcvmm\Desktop\data\blog> hugo new site quickstart
Congratulations! Your new Hugo site was created in C:\Users\pcvmm\Desktop\data\blog\quickstart.

Just a few more steps...

1. Change the current directory to C:\Users\pcvmm\Desktop\data\blog\quickstart.
2. Create or install a theme:
   - Create a new theme with the command "hugo new theme <THEMENAME>"
   - Install a theme from https://themes.gohugo.io/
3. Edit hugo.toml, setting the "theme" property to the theme name.
4. Create new content with the command "hugo new content <SECTIONNAME>\<FILENAME>.<FORMAT>".
5. Start the embedded web server with the command "hugo server --buildDrafts".

See documentation at https://gohugo.io/.
PS C:\Users\pcvmm\Desktop\data\blog>

生成quickstart时,hugo甚至还贴心的给出了接下来的步骤。 我们命令行先进入终端 cd quickstart,发现其目录结构如下

/obsidian%E4%BB%8E%E9%9B%B6%E5%BC%80%E5%A7%8B%E6%90%AD%E5%BB%BAhugo%E5%8D%9A%E5%AE%A2%E4%BA%8C%E5%BF%AB%E9%80%9F%E5%BB%BA%E7%AB%99/Pasted%20image%2020231110210410.png
每个目录的详细信息请查看 Directory structure | Hugo (gohugo.io)

接着执行git仓库初始化

1
git init # 执行git init对站点进行git仓库初始化以便于我们添加主题模块

如果发现连不上github,就在终端用代理 $Env:http_proxy=“http://127.0.0.1:7890”;$Env:https_proxy=“http://127.0.0.1:7890”

1
git submodule add https://github.com/theNewDynamic/gohugo-theme-ananke.git themes/ananke

官网的命令是 echo "theme = 'ananke'" >> hugo.toml,但是powershell不能这样执行,实际上这句命令意思就是往hugo.toml 最后一行追加 theme = ‘ananke’,也就是给站点指定主题。我们用vscode编辑这个文件。 hugo.toml

1
2
3
4
baseURL = 'https://example.org/'
languageCode = 'en-us'
title = 'My New Hugo Site'
theme = 'ananke'  # 指定主题

日志如下

 1
 2
 3
 4
 5
 6
 7
 8
 9
10
11
12
13
PS C:\Users\pcvmm\Desktop\data\blog\quickstart> git init
Initialized empty Git repository in C:/Users/pcvmm/Desktop/data/blog/quickstart/.git/
PS C:\Users\pcvmm\Desktop\data\blog\quickstart> $Env:http_proxy="http://127.0.0.1:7890";$Env:https_proxy="http://127.0.0.1:7890" 
PS C:\Users\pcvmm\Desktop\data\blog\quickstart> git submodule add https://github.com/theNewDynamic/gohugo-theme-ananke.git themes/ananke
Cloning into 'C:/Users/pcvmm/Desktop/data/blog/quickstart/themes/ananke'...
remote: Enumerating objects: 2659, done.
remote: Counting objects: 100% (88/88), done.
remote: Compressing objects: 100% (53/53), done.
remote: Total 2659 (delta 38), reused 64 (delta 28), pack-reused 2571
Receiving objects: 100% (2659/2659), 4.51 MiB | 338.00 KiB/s, done.
Resolving deltas: 100% (1471/1471), done.
warning: in the working copy of '.gitmodules', LF will be replaced by CRLF the next time Git touches it
PS C:\Users\pcvmm\Desktop\data\blog\quickstart>
1
hugo server

此时就可以打开 http://localhost:1313 查看页面了。

/obsidian%E4%BB%8E%E9%9B%B6%E5%BC%80%E5%A7%8B%E6%90%AD%E5%BB%BAhugo%E5%8D%9A%E5%AE%A2%E4%BA%8C%E5%BF%AB%E9%80%9F%E5%BB%BA%E7%AB%99/Pasted%20image%2020231110211616.png

先按下Ctrl + C 停止服务器,在网站根目录下输入 hugo new content posts/helloworld.md

1
2
3
PS C:\Users\pcvmm\Desktop\data\blog\quickstart> hugo new content posts/helloworld.md
Content "C:\\Users\\pcvmm\\Desktop\\data\\blog\\quickstart\\content\\posts\\helloworld.md" created
PS C:\Users\pcvmm\Desktop\data\blog\quickstart>

会发现content/posts/下自动生成了helloworld.md的文件,其中包括的内容如下

1
2
3
4
5
+++
title = 'Helloworld'
date = 2023-11-10T21:19:57+08:00
draft = true
+++

+++里面是文档的信息,包括

  • title : 标题
  • date:创建日期
  • draft:草稿

更多文档属性请看 Front matter | Hugo (gohugo.io)

这时候我们就可以在这个md文件上书写了。

1
2
3
4
5
6
7
8
+++
title = 'Helloworld'
date = 2023-11-10T21:19:57+08:00
draft = true
+++

# 你好
世界!

再次启动服务器,为了构建这篇文章,我们还要加上-D参数 运行 hugo server -D

 1
 2
 3
 4
 5
 6
 7
 8
 9
10
11
12
13
14
15
16
17
18
19
20
21
22
23
24
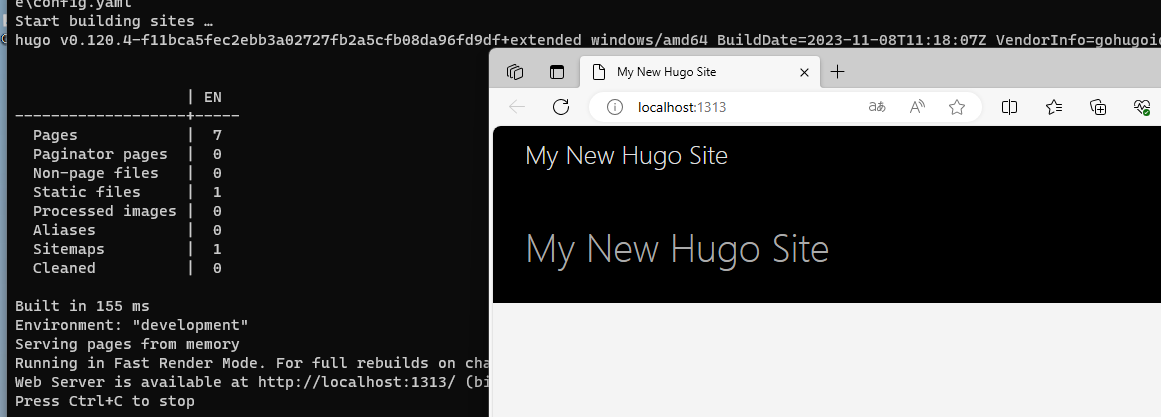
PS C:\Users\pcvmm\Desktop\data\blog\quickstart> hugo server -D
Watching for changes in C:\Users\pcvmm\Desktop\data\blog\quickstart\{archetypes,assets,content,data,i18n,layouts,static,themes}
Watching for config changes in C:\Users\pcvmm\Desktop\data\blog\quickstart\hugo.toml, C:\Users\pcvmm\Desktop\data\blog\quickstart\themes\ananke\config.yaml
Start building sites …
hugo v0.120.4-f11bca5fec2ebb3a02727fb2a5cfb08da96fd9df+extended windows/amd64 BuildDate=2023-11-08T11:18:07Z VendorInfo=gohugoio


                   | EN
-------------------+-----
  Pages            | 10
  Paginator pages  |  0
  Non-page files   |  0
  Static files     |  1
  Processed images |  0
  Aliases          |  1
  Sitemaps         |  1
  Cleaned          |  0

Built in 115 ms
Environment: "development"
Serving pages from memory
Running in Fast Render Mode. For full rebuilds on change: hugo server --disableFastRender
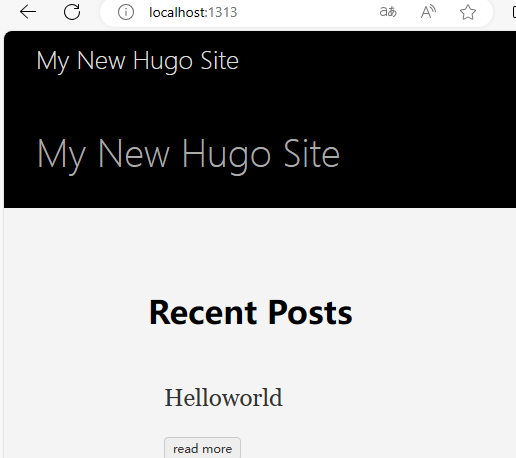
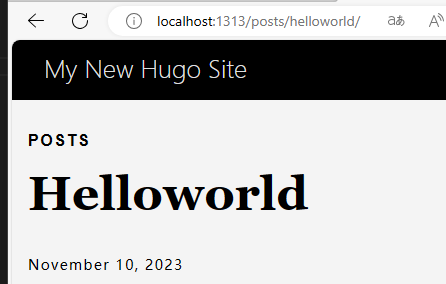
Web Server is available at http://localhost:1313/ (bind address 127.0.0.1)
Press Ctrl+C to stop

打开localhost:1313,看到我们的新文档已经生成

/obsidian%E4%BB%8E%E9%9B%B6%E5%BC%80%E5%A7%8B%E6%90%AD%E5%BB%BAhugo%E5%8D%9A%E5%AE%A2%E4%BA%8C%E5%BF%AB%E9%80%9F%E5%BB%BA%E7%AB%99/Pasted%20image%2020231110212746.png
点进去一看,非常完美
/obsidian%E4%BB%8E%E9%9B%B6%E5%BC%80%E5%A7%8B%E6%90%AD%E5%BB%BAhugo%E5%8D%9A%E5%AE%A2%E4%BA%8C%E5%BF%AB%E9%80%9F%E5%BB%BA%E7%AB%99/Pasted%20image%2020231110212819.png

参考: https://gohugo.io/getting-started/quick-start/

相关内容

hugo博客SEO优化
obsidian从零开始搭建hugo博客(一)环境安装
obsidian插件开发-链接的显示问题
obsidian插件开发-常用文件操作
用obsidian管理hugo文章小技巧